Microsoft (MS) Outlook is the most common and most popular communication tool used these days. The scope of MS- Outlook ranges from managing the emails to scheduling the meetings, sending the documents, managing the calendar and many more. Even though there are so many software for the communication purpose but MS- Outlook is the most valued software among the person and organization.
Even though MS- Outlook looks easier to run but there are certain features and tricks which might help to boost your skill or which you might not be aware of. Today I’m going to list and describe some of those.
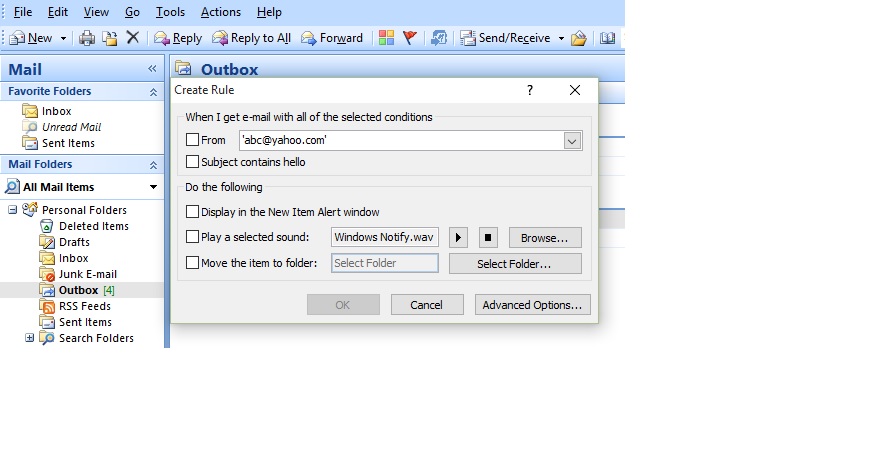
- Creating Rules
This is an awesome feature of MS- Outlook and highly useful. Suppose you want to move some emails to particular folder, which can be from particular sender, with some particular subject. Thus you can customize your emails and manage them properly. The best way to use this feature is click on the email (or type of email) in which you want to create the rule. Then choose “Create Rule”. Then you can customize your rule. Check on the particular rules and then click Ok.
- General Shortcuts
Below is the list of some useful shortcuts in MS- Outlook
| Function | Shortcut Key |
| Switch to Mail | CTRL+1 |
| Switch to Calendar | CTRL+2 |
| Switch to contacts | CTRL+3 |
| Switch to Tasks | CTRL+4 |
| Switch to Notes | CTRL+4 |
| Go to different folder | CTRL+Y |
| Search for text within a message | F4 |
| Create an appointment | CTRL+SHIFT+A |
| Create a contact | CTRL+SHIFT+C |
| Create a meeting request | CTRL+SHIFT+Q |
| Create a message | CTRL+SHIFT+M |
| Switch to Inbox | CTRL+SHIFT+I |
| Switch to Outbox | CTRL+SHIFT+O |
| Send a message | ALT+S |
| Reply to a message | CTRL+R |
| Reply all to a message | CTRL+SHIFT+R |
| Forward a message | CTRL+F |
| Post a message to a folder | CTRL+SHIFT+S |
| Create a New Message | CTRL+N |
| Open a new message | CTRL+O |
| Add a Quick flag to an unopened message | INSERT |
| Mark as Read | CTRL+Q |
| Mark as unread | CTRL+U |
| To send a message | CTRL+ENTER |
| Print a message | CTRL+P |
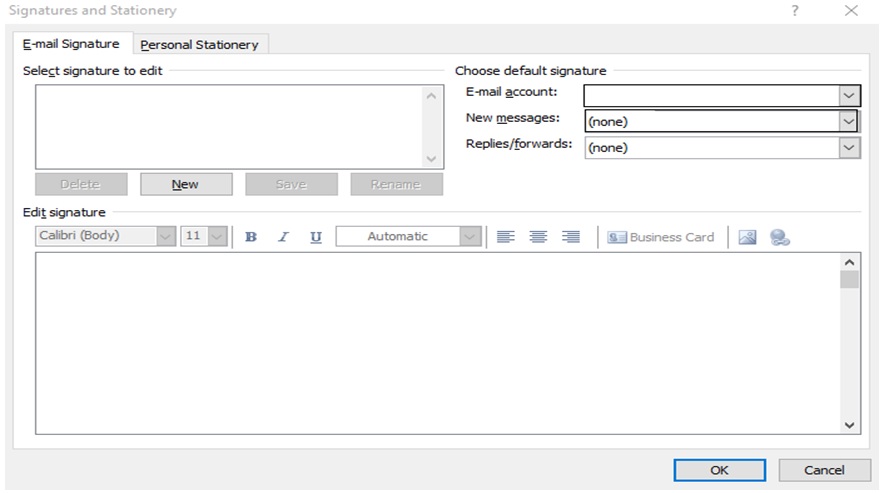
- Email Signature
Email signature refers to the information at the bottom of an email. Usually email signature contains information about the sender (for example, Name, position, Name of the Project, Name of the company, Contact Information etc) but sometimes some disclaimer information can also be written as the email signature. Thus it totally depends on the user on the information to mention in the Email signature
To use this function:
- Create a new Email
- On the message tab (2010, 2013) or in the Insert tab (2007), click on the signature button
- Under Choose default signature, click an email account to associate with the signature
- Under Select Signature to edit click on New to create an new signature and then under Edit Signature write the signature text as per your necessity
- Under Choose default Signature Choose the signature option for both New Messages and Replies/Forwards
- Autoreply while Out of office
You might have got amazed for the first time when someone is out of office and when you send a email to him, he will reply back with a message saying he is out of office. They keep that setting because if someone sent a email while he is out of office and the sender might be waiting for his reply. Instead when he gets that reply then he can contact the alternative person.
Assigning this setting is very simple, (In 2010):
- Click on the File tab
- Click on Automatic replies
- Click Rules and then click on Add Rule
- Under “When a message arrives that meets the following conditions” specify the conditions so that rule will be applied for the autoreply. For more condition click on “Advanced” and the select the appropriate options
- Under “Perform these actions” select the action you want to be performed (you can choose multiple options)
- Click on “Ok” thrice
In MS Outlook 2007, this function can be found under “Tools” tab
- Attach the file into the textbox
In the normal scenario, if you attach a file into the textbox of your new email, it will be listed under the attachment. But if you want to attach the file/document within the textbox then follow the following procedures.
- Create a New Message
- Go to “Options” tab and then under format, Choose on “Rich Text”
- Put the curser at the place where you want to add the attachment and then attach the file with regular procedure
- Schedule a meeting
Below is the easiest way to schedule a meeting
- Go to the Calendar and choose the “Day” view
- Make sure that the date is chosen is the date you want to the meeting to be happened
- Click on “New Appointment” if it is a onetime meeting or click on “New Recurring Appointment” if the meeting is supposed to be scheduled for multiple days or the recurring periods
- Provide the appropriate settings and then add the location and invite the attendees
- Provide the meeting details in the Text box and then send the invite
- You can attach the documents just like in a regular email
- Categorize the Emails
Emails in your Outlook can be arranged appropriately so as to make it easy for the user to sort them. For this, color categorization is the best option to apply. Application of the color will add the visibility to your outlook items.
- Navigate to Home tab > Tags>Categorize and then click on “Set Quick Click”
- Then in the drop down list of the “Set Quick Click” dialog box, select a color category
- You can even click “Set Quick Click” on the “Categorize” menu from an open message and then set the default color category for the future messages.
- Adding a Webex link to your meeting invite
Sometimes you might have seen the Webex meeting link in the meeting invite message. Instead of creating the instant Webex invite just before the meeting, there is a way to link one unique webex meeting invite link to your meeting, which will work for the recurring meetings too.
Below is the steps you need to follow:
- In the right hand side of the task bar of your computer, right click on the Webex meeting icon then initiate a new meeting
- Then the New meeting email message appears
- Look for the “Add Webex meeting” under “Appointment” tab and click on it
- As a regular meeting invite change the meeting settings, recurring details, invite the attendees and so on.
- Finally send the invite to your attendees